***Paint Classes***

***Paint Classes***
CLASSES HELD AT YOUR DESIRED VENUE
Showing posts with label Tim Holtz. Show all posts

Thursday, December 17, 2015

Christmas Blessings to YOU!

Wow! it's been over a month since I've posted!!
I have been crazy busy.  I guess we all are.
 
This week I've gotten back to my roots-doing some card making. Relaxing and fun!
 
With Christmas almost here-I get to use all sorts of combinations-traditional and nontraditional.
 
My first card is using die cuts. Spellbinders Oval and Tim Holtz Snowman.
 

This next one uses my beautiful Poinsettia die and my cricut sentiment. (NO stamping!!)

My greens and joy sentiment are from my cricut. LOVE the wood embossing folder from Stampin Up. I did cut them in "planks" and attach them to my white background piece. Vintage photo was rubbed on the folder before I put my plain tan cardstock in.

To get the shimmer and shine I used DecoArt Metallic Lustre in Emerald and gold.
                                          

                                               I'm entering the following challenges:
                                               Simon Says: Die Crazy
                                               Craft Stamper Magazine: stamping on the first card-snowman
                                               Word Art Wednesday: anything goes

I hope you and your family have a BLESSED CHRISTMAS!!!!!!


Sunday, February 1, 2015

Valentines Card with Tim Holtz tag inspiration


I am making Valentine's Cards like crazy!

This design follows Tim Holtz tag instructions this month. I made a card instead of a tag.
Used a vintage collage image from Altered Pages. Some designer paper from stash.

I like how it turned out!
Linking to Tim Holtz     

Saturday, July 5, 2014

Be still and know that I am God!

Happy Saturday!
 
I'm busy making thank you cards for my Relay Team Captains.  There are 32!
I always can get some inspiration over at Word Art Wednesday.
This week Challenge #139 is Anything Goes!!
 
You will be amazed to find out the scripture on my card below is FREE!  Every week
Word Art Wednesday gives you a new scripture that you can choose to use. 
The designer is Karen Murray.  You can find her blog HERE.
 
They have some awesome designers that share their creations every week.  They also give away prizes weekly!!  So check them out!
 
 After printing the scripture 4x6 size, I simply stamped a flower in 3 different color distress inks randomly around the page.  Easy!!  With beautiful results.  Once you save the scripture to your computer-you can print whatever size you need.  See on the left side-those are 3x5.
Thanks for stopping by!  Have a terrific weekend!

Flower stamp: Stampin Up -Reason to Smile
Distress Inks: Ranger: Rusty Hinge, Victorian velvet, Mustard Seed.


Wednesday, May 28, 2014

Mixed Media on Wood

I did a mixed media project on a wooden plague.  It's a graduation present for my best friend.
She's 50+ and just finished her Master's!!  That's a pretty awesome accomplishment. 
She deserved an awesome gift.
 I used a stencil by Retta in the corners.  Next added a layer of gesso.  Faber Castel Gelatos came next. Look at those colors!! Retta and I were on Skype at the time and she helped with wonderful suggestions of where to add which color.  (thanks Retta!!)
 The butterfly is a Stampin Up stamp that I embossed in white, sponged Tim Holtz distress inks on, then fussy cut it.  The gate and vines are SVG files (from Retta!!) that I cut using my cricut.

Below is a close up of the texture paste thru the stencil.  If your interested in getting some of Retta's stencils, go to Outlaw Women Scrapbook Emporium.  Her cutter files (SVG) can be found at her Etsy store Royal Inspirations by Retta


I'm entering the Eclectic Paperie Challenge. Using stencils.

Friday, January 17, 2014

A Perfect Day with Unity

Friends With Flair
 
I haven't got to use the new stamps much from Unity. One of the kits of the month has some beautiful ones in it.  I didn't want to take away from the stamp itself.
I stamped it directly onto SU designer paper.  Colored it in with Tim Holtz distress pens.  They have a water color look to them. Soft and lovely.

You can join in at Unity Stamp Company. 


Saturday, January 4, 2014

Cest Magnifique January Sketch

I love participating in their challenges.  I really had fun with this layout.
Started with a plain piece of vanilla 12x12 cardstock.
 
Using stencils and distress inks I did my background.
I wanted to feature my new grandson, my almost 2yr old granddaughter and of course-the proud grandparents!!
 
I pulled out some old stickers in my stash that was perfect for the way I feel. F for family, treasure, cherish and grandma.  I look forward to the new year and being the best grandma I can be!


I had some wooden scrolls (almost covered up by the flowers), the flowers are prima. I like them because they are fairly flat and work well on layouts going into albums.  All the pearls are from Wild Orchid Flowers.  The designer paper-one piece is Tim Holtz and the other is DCWV.


Saturday, December 21, 2013

Paper Artsy Challenge with Liz Borer

 I tried to follow the biggest part of her steps on my tags.  Since I don't have any of their paints, I embossed a lot of the stamping.  The hearts, outline of the boxes and sentiment were in black.  You can't see it in the pictures, but I also stamped the vine with hearts and then embossed it with clear. 
 Paper Artsy stamp set used EDY01 Eclectica by Darcy.  I loved it the minute I saw it!  I look forward to making even more projects with it.
 I did both tags side by side-just proof that you end up with different results!!  I knew I needed a baby tag-so I added some yellow with the barn door red.


Products used:
Prima flowers
Paper Artsy Stamp sets: Follow Your Heart & Garden of Dreams
Crafty Individuals stamp set CI-292
Unity Stamp artistic brick
Tim Holtz distress paint: mustard seed and barn door and picket fence
Wild Orchid doily
stazon black
Apple Barrel Antique White
Momento London Fog
Tim Holtz distress marker: vintage photo, worn lipstick and wild honey
Stampin Up dimensionals
Seam binding
Stampin up yellow ribbon
Black sharpie
Walnut distress ink

Thursday, December 12, 2013

Happy Holidays to PaperArtsy

I was inspired to make this arch with a technique done by PaperArtsy designer Joanne Wardle.
I painted the gesso'd chipboard with a teal blue acrylic paint. Covered it with crackle glaze and let it dry overnight.  Then I painted with cream acrylic paint.  I got some awesome cracks!
 
Then I stamped the song stamp from Tim Holtz Christmas stamp set with brown Archival ink.
I used several colors of distress inks.
Stamped the sentiment with Black Stazon.
Stamped the pine with pigment ink and then embossed with clear embossing powder.
I stamped the Santa image on mixed media cardstock and colored with oil pastels.
I coated the white parts with snow writer.
 Added red and clear bling to finish it off.
Here's a close up showing the cracks.  Love it!

Just over to PaperArtsy to get some inspiration yourself!


Friday, November 29, 2013

Celebrate the Season card

I wanted to play some challenges this week. Two of my favorites are
Unity Challenge and Mojo Monday.
 Friends With Flair at Unity Blog- use a unity stamp
 
Mojo Monday 321 -uses a sketch


I did 2 slight variations.  I like the second one the best-more distressing! plus I added some lace.
I used Tim Holtz Distress markers for the pretty Christmas ornaments.
The paper is Teresa Collins Christmas Cottage.

LOVE IT! Don't you?
Hope you had a great Black Friday.  I spent most of it with a good friend & my God Child-Carter. Had loads of fun.

Saturday, August 10, 2013

Fun technique using distress paint and scripture!

***FUN with distress paint and scripture***

I was so inspired by the way Antoinette at Inspired Stamps memorizes scripture.

I was also inspired by the new challenge at Faber-Castell with Mou.  
"Using favorite words to live by"

I already love doing encouraging cards and art. 
I recently got some of  Tim Holtz distress paints.
You can create a wide variety of looks with them.
I started with some mixed media paper.  If you haven't used any-you need to try it.
It absorbs the inks and other mediums you use without breaking down.
Sorry this pic ended up upside down! LOL
Hope it doesn't make you dizzy!!

Colors used Vintage photo, Barn Red, Mustard seed


Shake them well-they are paint and have to be mixed good before using them.  Then dab them on your craft sheet. I dab-dab-dab and then rub-rub-rub in a circular motion.  when you get the paint where you want it-spritz it with water.  The water activates the paint.


This is a picture of the leftovers on the Kraft mat.  Below is the first swipe I did using a white piece of regular card stock.  The great thing about this technique is the paint goes a long way.  i don't waste any of it!  I have several pieces of paper ready and swipe them until it's all absorbed and gone from the mat.
 After the paper dried-I spritz it good with some Vanilla Shimmer smooch spritz.  Allow that to dry well.  Since I do several pieces of papers at a time-I usually dry overnight so I can't tell you exactly how long it takes.  If your like me, we have other projects going-so lay them aside and work on something else.
Once dry, I cut it to the size I need.  In this case, I'm making a standard card, so I cut it 4x5.25.  That way I can back it on brown card stock to attach to my white card base. I then stamped this cracked stamp over the whole page using Brown Archival Ink. 

I save all my scraps-so I grabbed an ivory piece to stamp my scripture on.  As you can see from my stamp-I use this one a lot! It's one of my favorites.

This stamp set also includes some stitching stamps, so I used the small X's to go around the scripture, then cut the edge with my decorative scissors.

I can't do a piece without using Tim Holtz distress ink! It adds so much character to any project.  After going around the edges smudging it in, I also rubbed it on just the edges to get them a little darker.

I cut some hearts and some raffetta.  Tied the raffetta across the top of the background page before attaching it to the brown card stock with score tape. Using dimensional pop dots I added the sentiment & hearts to finish the card. 

Here's my finished card!  It's totally AWESOME!  Love this technique.
This would also look really good framed.  It could easily be made to fit a 5x7 frame.
Below is a close up showing the dimension.


 Thanks so much for the inspiration Inspired Stamps and Faber-Castell!  I hope you'll be inspired to give it a try yourself. 

Complete list of products used:
Tim Holtz distress paint  mustard seed, vintage photo, barn red
Tim Holtz distress ink vintage photo
Vanilla Shimmer Smooch Spritz
1/4" Scor-Tape
Kraft Mat
Raffetta
Stampin Up Hearts punch
Staz-on Jet Black
Archival Ink Coffee
Inspired Stamps
Mark's Finest Paper and Stamps-You Crack Me Up
Stampin' dimensionals


Friday, July 26, 2013

Christmas in July-Vintage Tag

Happy Friday!

We're winding down with Christmas in July.  I wanted to share a Christmas tag I made today.

I wanted to encourage you to stretch outside the box on creating Christmas themes.
Today I used Graphic 45 French Country paper for most of my tag. I did sneak in a small square of Tim Holtz paper with the Christmas words. 

I have a new stamp from Hampton Arts: Square Face Frame.  I definitely wanted to use her some way.

So here's what I came up with:


I mounted my face onto a piece of cardboard, colored her with prisma pencils.  Coated it with glossy accents.  
I have a small piece of cheese cloth in the back, some lace and velvet ribbon on the bottom.  A couple of vintage buttons.
I love how it turned out!  
I hope this inspires you to get your Christmas groove on!! 

You can find all the products I used at our shop  HERE-Outlaw Women Scrapbook Emporium

Our prices are always 20-25% off retail. 

Thanks for stopping by!


Friday, July 19, 2013

Christmas in July-Mini Album Style @ OWSE

We're still celebrating Christmas!  It's been fun -not sure I'm going to stop at the end of the month! LOL.
Today I'm bringing you a mini album with a different binding technique.  It's made with paper bags.  I've used the cheap brown lunch bags.  Since my style is usually vintage-brown is always a nice backdrop.

Here's the binding tutorial http://www.youtube.com/watch?v=DPscV6GA9wA

 There is tons of room in these paper bag minis.  I have only one tag on the inside of each pocket, but you could easily fit 2 more or slide things you want to keep up with inside.
 There are tag pull outs inside each bag.  I used three bags.  Cut the ends off and ended up with a 5x5 area to put the designer paper in.  When you glue a corner on a page-only attach the outside edges with glue -that way you can slide a picture under the edge to hold it in place.
Here are the supplies I used from our Outlaw Women Scrapbook Emporium

Tim Holtz Christmas Stamps: holly limb, pine cone & sentiment
MME Christmas 6x6 pad paper
cardstock
adhesive
ribbon
Ranger Vintage photo distress ink
Paper cutter

I hope you like the mini.  It will stand as well as lay out nicely on a coffee table. I love displaying my pictures in such an interesting way.  Please let me know if you have any questions.

Thanks for stopping by!
Karen C

Sunday, May 5, 2013

With all my heart


A close friend got married Saturday.   Who doesn't love spring weddings?
I jumped at the chance to use the sketch at Mojo Monday #291


 I used Close to my Heart Valentine's stamp set.  I stamped the biggest rose on cream cardstock using versa mark and clear emboss powder.  Then I sponged/rubbed TH berry distress ink on top of it to make it pop.

The rose embellishment was embossed with cherry cobbler.  I colored it with aqua painter and markers.

The sentiment was also done with cherry cobbler emboss powder. 

The beautiful vintage lace I get from a friend.


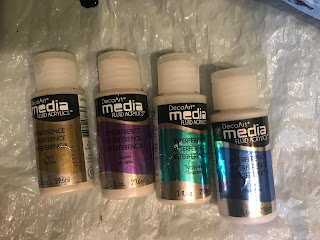
Fluid Art with DecoArt Interference Paint

I've been experimenting with fluid art.   Trying to get cells to create is hard! I've tried multiple mediums, multiple products.  Th...