***Paint Classes***

***Paint Classes***
CLASSES HELD AT YOUR DESIRED VENUE
Showing posts with label Canvas. Show all posts

Sunday, August 12, 2018

DecoArt Media Fluid Acrylics as watercolors

Watercolor is what everyone is doing right now.  I only have the cheap set from Walmart. So I got my Decoart Media Fluid Acrylics out and used them like watercolors. The pigment is is so concentrated, you only have to use a tiny bit of paint.
The stamps are from Unity.  The first one I embossed with black.  The 2nd one I used Black Andrionick ink.  I painted them on 8x8 size canvas.   I like the sun the best. 


I used Unity Stamps on both canvas.

I used the following colors:
#1 canvas
Yellow Gold Light
Green Gold
Phthalo Green Blue
Primary Cyan

#2 canvas
Titanium white
Ultramarine Blue
Primary cyan 
Hansa Yellow Medium
Phthalo  Orange
Carbon black


Thursday, December 17, 2015

Mixed Media Shadow Box Canvas with DecoArt

Two posts in one day!! I just had to share with you this awesome shadowbox picture I made with the backside of a 11x14 canvas and DecoArt products.
 
I started the beginning of the canvas by using a brick wall stencil and DecoArt Modeling Paste. Allow it to dry really well.  Then apply two coats of DA Gesso. Allow to dry overnight.,
 
Then I used DA Misters.  Yellow first.  Then I needed brown.  They don't have a brown-so I made one!!  That's right-I poured some Orange out of the bottle and added some Primary Cyan and Red -shook the bottle up well and viola' I had brown!!
 
The misters have a lot of pigment in them-so keep a water bottle handy to spray them immediately so they'll run and spread.  I kept layering until I achieved the color I wanted.
Then I decided I'd add some Metallic Lustre to the inside. Lavish Green, Iced Espresso & Cosmic Blue.  Talk about shimmer!!
 I used the Cosmic Blue, Majestic Purple and Champagne Ice to the butterflies (after coating them with gesso) Talk about beautiful!!!


 Added some Designer paper from KaiserCraft, mulberry flowers from Wild Orchid Flowers, some lace and twill from my stash.  This photo really does do it justice!!  It's gorgeous!!
Entering Blue Fern Studio December Challenge.

Sunday, December 28, 2014

Daughters are Mom's Best Friend

I have had the pleasure in making several of these canvas's for friends.
 
It's a reminder that our daughters end up being our best friends!
 I painted the dresses in colors to match the individual. I loved each one!

Friday, April 25, 2014

By the Sea Canvas

Happy Friday!!
Karen here with another amazing background!
This is a 9x14 flat canvas.
Did you know you can punch holes in it with your Croc-A-dile?
Isn't that COOL!
 
 I painted 2 coats of white gesso on the canvas first.  Then I used the dabber distress inks.  Blue, green and polished nickel.  It's my favorite way to build the backgrounds.  I hit it on the canvas pretty hard while squeezing-you get a big SPLAT!  Then give it some spritz of water & hold the canvas up and let it spread.  I got my heat tool out and start blowing the ink around.  You may need to splat some more until you get the look you want. 

I printed this gorgeous drawing (by Retta) and colored it with colored pencils-spray it with a sealer before gluing it onto your canvas.  I adhered it with mat medium.  I used gelatos in blue and black to go around the edges. 

I love how this turned out.  It will make someone with a beach theme very happy!

Saturday, December 28, 2013

Design Memory Craft Design Team call

I'm applying for the Design Memory Craft Guest Designer.
The last couple of years my style of crafting has changed so much!
There are so many products available and I love trying new ones and learning new techniques.
 
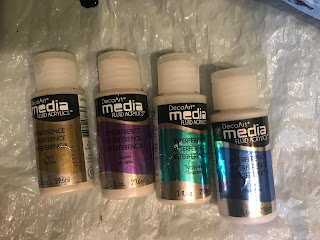
Faber Castel Gelatos have become one of my favorites!  There are many ways to use them.
Creating mixed media has endless possibilities. I've used canvas for this project.
I started by applying gesso to a 9x12 flat canvas.
I mixed some Tim Holtz stain to modeling paste and applied to my canvas using a brick stencil.
It needs to thoroughly dry before continuing.
 I used the 3 colors of gelatos and roughly colored in the "unstenciled" areas.  (I realize that's not a real word-but blank area sounds so plain!)
 Using an old paint brush and a little water, I started moving the colors around.  It looks like a hot mess below-but wait for it!!
 I sprayed water on it.  This step is entirely up to each individual-how much water you want to use, how much drippage you'll achieve. (spell check is again telling me-drippage is not a word! I think it aptly describes what I'm doing!!) 
 I started drying the runs with my heat gun. I also love the look of dabbing off with a paper towel. Don't be heavy handed or you'll remove too much of your color.
 To bring accents to my bricks, I did a couple of things.  Rub the gelato on your craft mat and use a paint brush to bring in color around the edges.  I also used the Faber Castel White Pitt Pen to add highlights to the corners.  Lightly dab with the paint brush to smooth and combine the colors.  Your canvas needs to be dry, so keep using your heat tool.
Using a clock stencil, I stippled Picket Fence distress paint in several areas.  I had a tiny amount of this brown smooch spritz and I held it back and sprayed a couple of times.
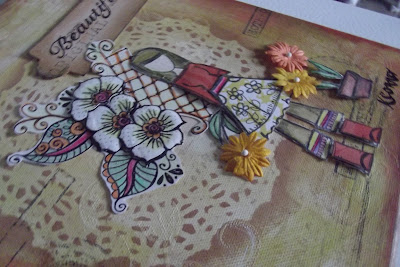
 I'm embellishing the canvas with MME designer paper and chipboard accents, die cuts from Memory Box, a lace doily from Wild Orchid flowers and printed my Baby Info on my computer.
 I punched holes at the top corners of the canvas and attached some blue and white cord I had in my stash.  Made it a little long-my daughter in law can adjust it when she hangs it in the baby's room.
 Below is an extra photo showing off my new grandson!! Isn't he precious?  Brianna hugs and kisses him.  I'm sure that will change as they get older!
 I love how it turned out and will make a beautiful gift for her!  Showcases my two favorite grand children!! (my only grand children-ha!)

Keep your fingers crossed-hopefully my style and creativeness will catch their eye and I'll be asked to join their team!  Thanks for stopping by and I hope you'll be inspired to make your own mixed media project.
If you have any questions, please let me know-I'll be glad to help you.


Friday, November 8, 2013

Snowman for Christmas

I adore doing these canvas pictures.  The Christmas theme is quickly becoming a favorite for me.
I create my background using gesso, Traditions acrylic paints, sprays.  Some brushed on, some stenciled on and some sprayed.
I roughly free hand drawed the snowman and the tree and cut them out of good quality designer paper.  The cheap stuff doesn't hold up as well.  Using liquitex matte medium I glue them down.
 
Then the fun starts again!
I paint and smear using brush and fingers.
To get the edges and the shading I used GELATOS.  LOVE those!!


I love my finished piece.  I'll be entering it in the November challenge at Faber Castell.  One of my favorite companies!!

Tuesday, November 5, 2013

Santa mixed media canvas

I have loved making Christmas items.  This is a flat canvas board. Size 9x11.
The background was started with Liquitex matte medium and ripped book page pieces.
I sprayed blue inks around the edges, then brushed acrylic gesso on the inside. 
I glued punched snowflakes (SU punch)-used blue and grey designer papers.
I free hand drew the santa on piece of designer paper and cut him out. Glued him on.
Painted him with Traditions paint.
Did some stenciling over top of him.

 Punched two holes in the top and threaded some satin ribbon to hang it with.


Entering this into Craft my Life challenge.

Friday, September 27, 2013

She Art Collage on Canvas

I'm so inspired by the She Art that Christy Tomlinson creates.
Here's my attempt.
The background starts with ripped tissue paper.  I love the texture and dimension it gives.
They you do a variety of spray inks on top, then I sprayed using some stencils.  I even did some dabbing around with some bubble wrap before and after I added my hand cut houses and girl.
 I roughly drew the outline of the girl on one piece of designer paper, then I cut pieces of laces and trims and other colors of paper and added it to her.  Hot glue works the best for me on adding the trims and rosette.
 The houses are really fun to make!  I just mixed matched some of the designer papers and used a glue stick to put them together.  Once I glued them onto the canvas using matte medium, I used a black pitt pen to outline them.
 The die cuts are from my stash and were added with hot glue.
I printed the sentiment out on my computer, used matte medium to adhere to the canvas, then outlined with my black pitt pen.

We have a large line of stencils, designer paper, matte medium, adhesives, spray ink, acrylic paint at our shop located Outlaw Women Scrapbook Emporium.  Our prices are ALWAYS 20-25% less.
Join our group and enjoy receiving emails and updates with more discounts.

Have a HAPPY FRIDAY!!
Thanks for coming by

Monday, August 12, 2013

PaperArtsy Challenge


This week at PaperArtsy -France Papillon has a challenge going-Hearts
 This is a 5x7 canvas. I laid some cheesecloth over top the canvas and smeared modeling paste over it.  Pull the cheese cloth off and allow to dry completely.  Then I layered pigment ink over top with a makeup sponge. I did some stamping with stazon black ink with a script stamp.
I printed my sentiment -sprayed with varnish so the ink wouldn't smear-cut it out and adhered to the canvas with gel medium.  Doodle around the edges to blend into your canvas.
 Once the cheese cloth dried I hand cut a heart from it. Layered it with some ribbon, crochet flower and a pearl on top.


Since it's on a flat canvas, it can be displayed on an easel or put in a frame.
I love how it turned out.

Thanks for stopping by & please leave a comment telling me what you think!
Have a blessed week.

Monday, August 5, 2013

Unity girl canvas


I have loved Unity stamps for a long time.  Quality and size are a plus with them. 
They have some awesome designers.  So much inspiration.
I did my best to impress!!
 This is an 8x10 canvas. I applied a thin coat of gesso. Applied some versa inks, some red and white acrylic paint. I used a baby wipe to tone down the red-I had way too much.  
I sponged Tim Holtz Vintage Photo ink over top of a paper doily in the center.

 For my Angie girl and the flowers, I colored them with prisma pencils.  Cut out an extra set of flowers and used dimensionals to stack them on top of the main image.  Did the same thing with the girl's shirt and skirt.  Really adds character to your piece.  I added some wild orchid flowers where the  paper flowers would have been.

Doing Mixed Media is my favorite technique.  Using Unity stamps to achieve a completed pierce makes it so worthwhile!

Thanks for stopping by and seeing my canvas.


Wednesday, December 12, 2012

It's all about you: Whimsical Girl


 First, I covered the canvas with pink tissue paper using mod podge. After it dried good, I rubbed Tim Holtz Antique photo distress ink over most of the canvas with a sponge.
2nd- I drew my girl's face and neck in my sketch book, colored it with Derwent colored pencils and cut it out.
3rd-I laid the face on my canvas to judge how big to cut the dress and wings.  My wings were cut out from a book.  I used Tacky glue to attach my pieces to the canvas.
4th-I painted her hair with brown acrylic paint.
5th-I stamped various words and music notes several places. I stamped the letters LOVE over her head.
6th-I embellished her -running tiny brown and lavender pearls in her hair, some lace around her neck and hair, flowers.
7th-sprayed her with 2 coats of fixitive.

I LOVE how she turned out.  FYI inside the heart I stamped "it's all about you"

My intention is to encourage young girls.  They are growing up with low self esteem thinking they have to be a certain way to receive love and acceptance.

Please pray for our youth.


Sunday, December 2, 2012

Multi Media Canvas


I've been practicing a new techqniue with Ranger spray ink.
I did the first layer with yellow, then layed some flowers and spritze with cranberry.
Using a roll of paper towels, I rolled overtop of it. 
After it dried I hand drew my lady and painted her with acrylics.
 This next canvas I layered papers, scripture and wild orchid flowers.
 The next box canvas I used my new stencil from OWSE. Had lots of fun making this one. Used an image from Meljen's design.. I colored my image with pencils. Added some foam snowflakes that I coated with blue glitter.

Fluid Art with DecoArt Interference Paint

I've been experimenting with fluid art.   Trying to get cells to create is hard! I've tried multiple mediums, multiple products.  Th...